


Atomfall
A survival-action game inspired by real-life events, Atomfall is set five years after the Windscale nuclear disaster in Northern England.
Explore the fictional quarantine zone, scavenge, craft, barter, fight and talk your way through a British countryside setting filled with bizarre characters, mysticism, cults, and rogue government agencies.
My Role
My level design responsibilities for Atomfall included the creation of Robotics Lab, Secret Tunnel and the Chemical Testing Bunker. For all of these levels, I was responsible for all aspects of design, from initial thematic exploration to whiteboxing and building out each area, including puzzles, loot placement and enemy encounters.
Robotics Lab
The Robotics Lab is a major quest dungeon interior in Atomfall. It's a non-linear space with Metroidvania-style elements, spread across two floors. Players can explore the upper floor as soon as they gain access to the area. To reach the lower level, however, they’ll need a Signal Redirector. Once they have it, they can take on the large door puzzle that separates the two floors.
This level went through several redesigns and iterations. Below, I’ll walk through the major phases of development and how I arrived at the final version of the space.
Early Designs
Early on, I designed this level to be accessed from the exterior sandbox. I wanted to create several interconnected spaces, each with a distinct look and theme. I settled on the first location being a disguised weather station, with its entrance placed in Dales, the first sandbox area players explore in the game. After initially investigating the interior of the weather station, players would need to solve a traversal puzzle to unlock the door to the next area.
That next space was a large cavern, originally part of the Interchange’s early design. It was envisioned as a wide, open area featuring traversal elements and a planned enemy encounter. A group of Ferals was set to ambush the player as they descended deeper, eventually discovering the entrance to the Robotics Lab.
At that stage, the Robotics Lab was a linear culmination space, ending with a boss battle. It featured a single floor with a main corridor leading to the prototype robot fight, along with a few satellite rooms to explore along the way.


However, as the Interchange evolved in both shape and function, it became clear that the Robotics Lab needed to change as well. My original three-stage design had to be scaled back to a single space, mainly because the entrance no longer made sense being in the sandbox. The cavern area was also cut; it was too large for what it offered and would have required significant art and design resources to complete properly.
Level Iterations
At this point, the mandate was to turn the Robotics Lab into a self-contained space with an entrance that could be placed anywhere within the Interchange. I focused on making the lab more engaging from a gameplay perspective, using the opportunity to refine the layout and puzzle design. This is when I decided to split the space into two floors to support a Metroidvania-style progression blocker. The lower floor would be locked behind an environmental puzzle that could only be solved using the correct tool.
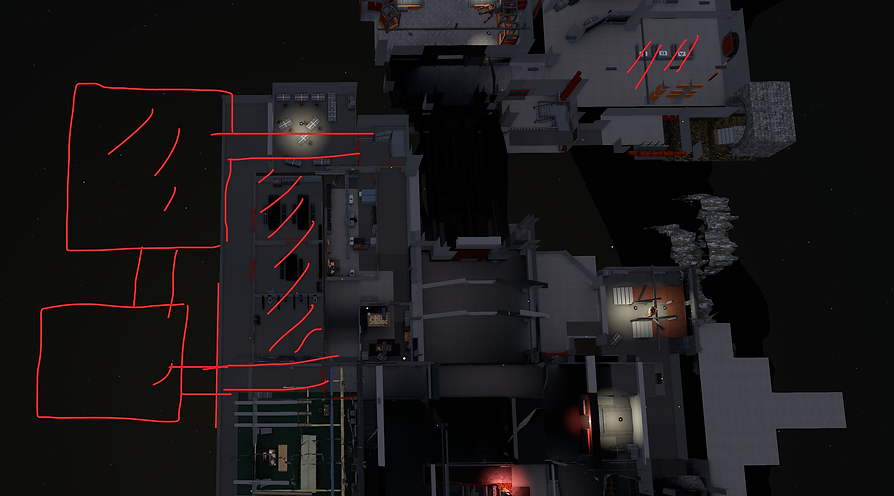
The following video shows a general run-through of the space as it existed at that stage, culminating in a laser cannon puzzle. The puzzle was designed as a timed challenge, requiring players to activate two switches in separate rooms quickly enough to overload the laser and blast open the door to the lower level.


Final Pivot To None Linear
Eventually, it was decided that this space should better align with the rest of the quest dungeons, which were mostly being designed as non-linear experiences. We wanted to give players the freedom to explore at their own pace, interact with the environment, and have the option to leave and return later. While the Signal Redirector enabled that from a gameplay standpoint, the level itself also needed to be more open and freeform to fully support that design approach.
This was also when I redesigned the Metroidvania-style door puzzle into its final form, using the signal redirector and aligning it more closely with the puzzle design seen throughout the rest of the game. The bespoke boss encounter was cut in favor of two robots that activate once players reach the lower floor.
.png)


Secret Tunnel
The secret tunnel was originally envisioned as an old priest hole. Historically, priest holes were hidden spaces built in England and Wales during times of Catholic persecution. It was later repurposed as a smugglers’ passage and by the time the game’s protagonist discovers it beneath the village pub, it has long been abandoned, only recently unearthed, now hiding something alien within. From a gameplay perspective, the tunnel serves as a connection between the Village area and the Skethermoor sandbox.

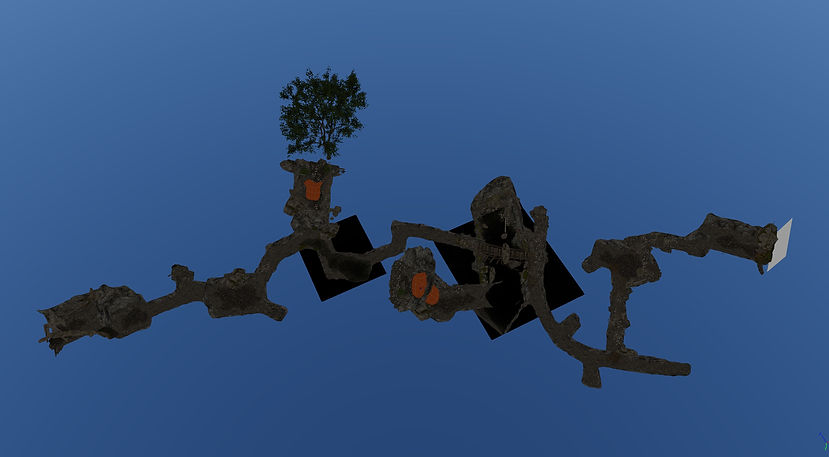
The tunnel was built almost entirely using Houdini’s procedural tools, specifically the cave tool. I previously used these tools to build sandbox collision for Sniper Elite 5. Houdini made it easy to quickly design and iterate on the cave based on feedback, removing the need for a traditional whitebox in this case.
Early Designs
Early on, I explored a cave layout that resembled a maze, with long, winding paths that twisted back on themselves, splitting and merging along the way. The goal was to create a space that felt rewarding to explore and could stand on its own as an interesting, self-contained environment.
The space was functional, but something about it wasn’t working. Through iteration and team discussions, we realised that while it was intended to be a quick connection between the Village and Skethermoor, it had evolved into an overly long dungeon, one where players could easily get lost or die to traps and enemies. I was still fond of the layout, but ultimately I was asked to redesign it into a smaller, more streamlined space that better served its purpose as a transitional link between the two environments.
Final Layout
To get the space working as intended, I had to rethink its entire flow. Instead of maze-like pathways and hidden rooms, I redesigned it with larger, self-contained rooms that were easier to read and navigate. Each room was built with a clear line of sight toward the next destination, helping guide players intuitively through the space. Once I applied this design approach, the cave naturally became less complex and much quicker and smoother to get through, whether entering from the Village or Skethermoor side.


Chemical Testing Bunker (DLC1)
The Chemical Testing Bunker is a loot dungeon located on the Midsummer Isle of DLC1. Players are sent on a quest to infiltrate the lab and retrieve the Corrupted Dagger. I drew my inspiration from real-world laboratories, which are usually built with clear separation of functions and easy access to essential equipment.
My design centered around a large, central room as the lab’s core, with all other spaces branching off from it. While I expected the layout to evolve through iteration, I wanted to preserve this central hub to maintain the original intent of the design.


Early Designs
The initial design had three distinct wings of the lab: administration, support and chemistry. This version spanned two floors, with the admin wing located on the lower level. I envisioned that area being flooded, requiring players to wade through water while fending off fish-men enemies.
On the main floor, the central lab room sat at the heart of the layout, and I placed the Corrupted Dagger objective there. I wanted players to always have a visual on their final goal, no matter where they were in the dungeon, creating a clear sense of direction and progression.

As the design evolved, I decided to move the admin wing out of the flooded floor and replace it with a chemical waste storage wing. At this stage, the area was still intended to be submerged and filled with fish-men enemies.

Final Layout
As development on DLC1 progressed, this space needed to serve a slightly different role in the overall flow. It was decided to remove the fish-men enemies and cut the lower floor entirely, as we wanted the dungeon to be completed relatively quickly. There was also concern that sending players to a lower level would break the visual connection to the main objective and disrupt the sense of focus.

The final layout included the waste storage and maintenance areas, the admin wing, and the chemistry wing, with the large central lab space still at the heart of it all. Even though the level went through several iterations, I was glad that my main core design ideas remained intact, especially the central lab and the placement of the objective in the middle, always visible to the player throughout their journey.


